Testing
Sep 22, 2025
Tune in to Live@7withHelen Thursday nights at 7pm on Facebook and YouTube for great deals, demos, sneak peeks and more.

Meet Judith and Josephine
Jul 17, 2021
By
rizel
0 comment(s)
'
We have a new toy in our shed and are slowly learning and playing with lots of new yummyness for us all....
Checkout these mini embroidery frames and brooches - just two to start with but many more to come. We can't wait to see how you all use them... Great for quick and gorgeous gifts for the special person or occasion..... Below is a tute on how I've been putting them together…

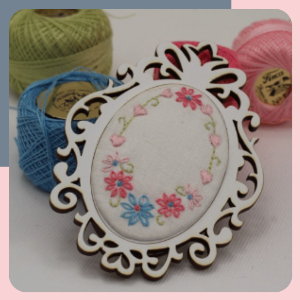
Josephine
This little embroidery frame measures approx 4" from top to bottom with a design area of about 40x60mm. You could do anything in this frame, mini EPP, stitchery, embroidery, stumpwork, tapestry, even just a photograph - anything you can dream of. The kit includes the frame, the inner cutout for framing over and a backing piece. The frames also include a metal wall hook you can glue on if you wish to.

![]()
![]()
Judith
The Judith brooch kit measures 2" top to bottom with the design area approx 24 x 34mm
She comes with a metal brooch back included.
Both are available in either white, black or plain MDF (you might want to paint them your own colour)

![]()
![]()

A quick Tutorial on how to use the mini frames...
Preparation: our frames are laser cut so depending on the material used some times some residue can be left. We clean the tops before packaging but if using a light fabric you may wish to wipe over all edges inside and out in case any residue (black soot type) transfers onto your fabric. Just use a damp cloth, babywipe or magic eraser.
Method: First, use the inner cutout of the frame to trace around to mark your design space onto paper - draw your design or decide what you will be putting into the frame.
Use a blue water erasable pen (or similar) to trace your design onto your chosen fabric - use a lightbox if necessary so you can see through. I recommend using a large piece of fabric so you can easily put it into your embroidery hoop.

Fuse a lightweight stabiliser to the back of your design fabric. You can use a thin woven or a thicker thin wadding - like Pellon H630 or Parlan to get a more padded or raised effect.
Place it into your embroidery hoop having the fabric taut but not stretched. Stitch your design.

Cut out your finished design adding approximately 1/2" on all sides of seam allowance. That's 1/2" bigger than the centre insert piece of wood.

If you used a thicker stabiliser you may want to pull it up and trim it back to the actual size of the wooden insert - so the wadding doesn't wrap around the edges making it too thick.

Using a strong thread make a running stitch around the edge of the seam allowance, place the wooden insert into the centre (wrong side) and pull up the stitches to tightly gather the fabric around the insert. secure.
Place the design insert into the centre of the frame, It should be firm, but carefully push it in until the back surfaces are even and flat.

Cover the back with clear strong craft glue and place the backing piece centrally onto it. Use wonderclips or pegs to hold until dry and secure. Glue your wall hook or brooch pin to the back if desired.

I am so looking forward to seeing what you all do with these new little products. We have plans for many more so if you have any ideas or requests please feel free to suggest...
and please share the love and post your designs onto IG with #hnkminiframes and we'll share your beautiful work with all of our friends too....


Hugs for today and happy stitching
Helen![]()

![]()
![]()
![]()
![]()
![]()
![]()
![]()
![]()
'